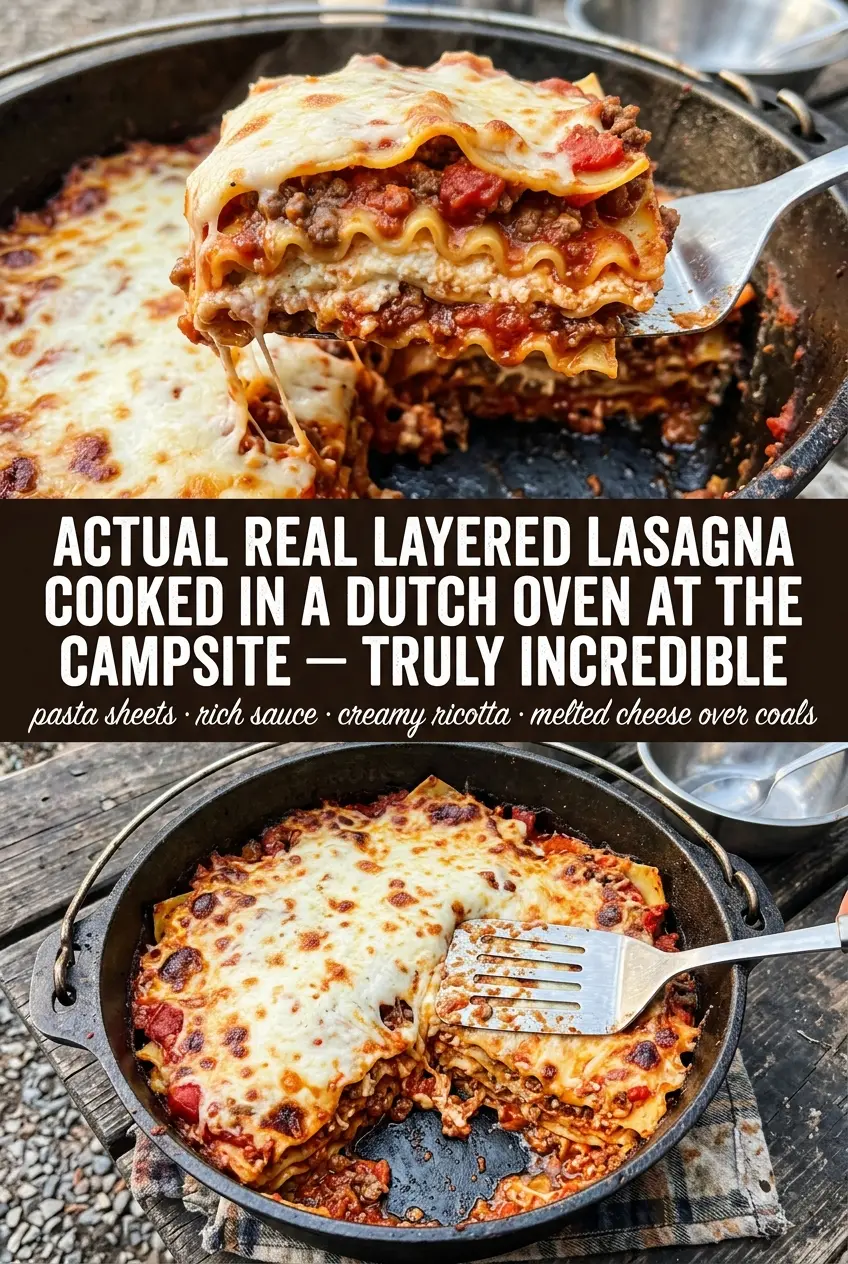
Layers of tender noodles, rich meat sauce, and bubbling cheese turn into a Dutch oven lasagna that holds together cleanly and scoops up with those browned, crispy edges everyone fights over. The top gets molten and golden while the center stays creamy, which is exactly what you want from a lasagna cooked over coals instead of in a standard oven.
What makes this version work is the balance between moisture and heat. The sauce goes in thick, the noodles cook right in the Dutch oven, and the lid traps enough steam to soften everything before the top browns. If the sauce is too thin, the noodles turn mushy; if the heat is too aggressive, the bottom scorches before the middle has a chance to set.
Below, I’ll show you how to layer it so the noodles soften evenly, how to keep the cheese from drying out, and how to judge the heat when you’re cooking outdoors. It’s the kind of recipe that looks rustic and still comes out polished enough to feed a crowd.
The noodles came out perfectly tender, the cheese browned on top, and the lasagna held its shape after resting. I was worried about cooking it over coals, but the timing was spot on and the bottom didn’t burn.
Save this Dutch oven lasagna for your next camp cook or backyard cookout when you want a bubbling, crowd-sized pasta dinner with a golden cheese top.
The Trick to Keeping the Bottom Tender Over Coals
The biggest mistake with Dutch oven lasagna is treating it like a stovetop pot or a regular casserole dish. Direct heat is too harsh. The bottom layer needs a cushion of sauce and enough steam to soften the noodles before the cheese on top fully melts. That’s why the first layer is a thin spread of meat sauce instead of dry noodles sitting against the metal.
Broken noodles aren’t a problem here, they’re part of the method. You’re fitting them to the shape of the Dutch oven, not building a perfect boxed lasagna. The other thing that matters is resting time. If you cut in too soon, the layers slide apart because the cheese and sauce haven’t had a chance to settle.
- Ground beef — Use enough fat to give the sauce body, but drain off excess grease after browning. Too much grease makes the lasagna feel slick and can pool at the bottom.
- Spaghetti sauce — A thicker jarred sauce works better than a thin one. If yours is loose, simmer it a few minutes before assembling so the noodles don’t turn soft before the dish sets.
- Ricotta mixture — The egg matters here because it helps the cheese layer firm up instead of oozing out when you scoop the lasagna. Full-fat ricotta gives the most creamy texture, but part-skim works if that’s what you have.
- Uncooked noodles — No-boil style isn’t required, but uncooked noodles need enough sauce around them to hydrate fully. If you use standard lasagna noodles, break them to fit the Dutch oven and overlap them slightly so there aren’t gaps.
What Each Ingredient Is Actually Doing in Dutch Oven Lasagna

- Protein (quality, proper thickness) — Good quality protein tastes better. Even thickness ensures even cooking.
- Seasoning (bold, distributed throughout) — Don’t be shy with salt and pepper. Quality seasoning elevates everything.
- Oil or fat (protective and flavorful) — The fat helps develop crust and carries flavors. Use generously.
- Heat management (appropriate temperature for the protein) — Too high and the outside burns before the inside cooks. Too low and it steams.
- Technique (sear, then finish based on thickness) — Proper technique creates flavor. Sear for crust, then cook through gently.
- Aromatics and seasonings (garlic, herbs, spices) — These add complexity and depth. Distribute them throughout the cooking process.
- Resting time (let it rest before serving) — Resting allows juices to reabsorb. This keeps the protein moist and tender.
- Optional: finishing sauce or glaze — A light sauce adds richness without overwhelming. Apply at the very end.
How to Layer It So the Noodles Cook Through
Building the Sauce Base
Start by browning the beef until the pink is gone and the bits at the bottom of the pan turn deep brown, not black. Those browned bits add flavor once you stir in the sauce. Mix the meat and sauce together while it’s still warm so the filling goes into the Dutch oven evenly and doesn’t cool into clumps.
Mixing the Cheese Layer
Stir the ricotta with one cup of mozzarella, the Parmesan, egg, and Italian seasoning until it looks thick and spreadable. Don’t leave the egg streaky or the layer can bake unevenly. If the mixture seems loose, let it sit for a minute; the cheese will tighten a little before you start layering.
Stacking the Lasagna in the Pot
Spray the Dutch oven well, then spread a thin layer of sauce across the bottom before adding the first noodles. Cover as much surface as you can with broken noodle pieces, then spread half the ricotta mixture and half the remaining meat sauce. Repeat the layers and finish with noodles, the rest of the sauce, and the final mozzarella. The top sauce layer keeps the noodles from drying out under the cheese.
Cooking Over Coals
Set the Dutch oven over hot campfire coals and pile coals on the lid for even top heat. You want steady heat, not a roaring fire under the pot. After about 45 minutes, check for bubbling edges and a knife that slides through the center with little resistance. If the top is browning too fast, pull some coals from the lid and let the inside catch up.
Make It Meatless With a Hearty Vegetable Sauce
Swap the ground beef for a thick mushroom and zucchini sauce or a plant-based crumble cooked down until most of the moisture is gone. The key is keeping the filling dense, because watery vegetables can leave you with soupy layers and undercooked noodles.
How to Make It Gluten-Free
Use certified gluten-free lasagna noodles and check that your jarred sauce is gluten-free as well. Gluten-free noodles can go soft faster than wheat noodles, so keep the sauce thick and avoid adding extra liquid during assembly.
Using Cottage Cheese Instead of Ricotta
Cottage cheese works in a pinch, but drain it first and expect a looser, slightly more textured filling. If you want it closer to ricotta, blend it briefly before mixing so the layer spreads more smoothly.
Storage and Reheating
- Refrigerator: Store covered for up to 4 days. The noodles continue to soften a little as it sits, but the flavor gets even better.
- Freezer: It freezes well in slices or as a whole baked lasagna. Cool completely, wrap tightly, and freeze for up to 3 months.
- Reheating: Reheat covered in a 325°F oven until hot in the center. The most common mistake is blasting it in the microwave, which turns the noodles tough at the edges while the middle stays cold.
Questions I Get Asked About This Recipe
Dutch Oven Lasagna
Ingredients
Equipment
Method
- Brown the ground beef in a cast iron skillet over medium-high heat, stirring until no longer pink. Mix in the spaghetti sauce and simmer briefly until combined.
- In a bowl, mix ricotta cheese with 1 cup mozzarella, Parmesan cheese, egg, and Italian seasoning until smooth and evenly blended. The mixture should hold together in thick dollops.
- Spray the Dutch oven with cooking spray, then spread a thin layer of meat sauce on the bottom. Aim for full coverage without thick pools.
- Layer 3 lasagna noodles (broken to fit) over the sauce. Press lightly so the noodles touch the sauce.
- Spoon half the ricotta mixture over the noodles, then spread it into an even layer. Leave a small border at the edges for cleaner bubbling.
- Spoon half the remaining meat sauce over the ricotta. Spread to cover most of the surface.
- Repeat the noodle-and-ricotta layers using another 3 noodles (broken to fit) and the rest of the ricotta mixture. Keep the layers level for even cooking.
- Top with the final meat sauce, then arrange the final 3 noodles on top. Make sure the top noodles are mostly covered by sauce to prevent dryness.
- Sprinkle the remaining mozzarella over the top layer. You want a visible, even cheese coverage for a golden finish.
- Cover the Dutch oven and cook over campfire coals with coals on the lid for 45 to 50 minutes. Look for bubbling edges and a melted, browned top.
- Let the lasagna rest for 10 minutes before serving. The slices will set up and stay neater when scooped.