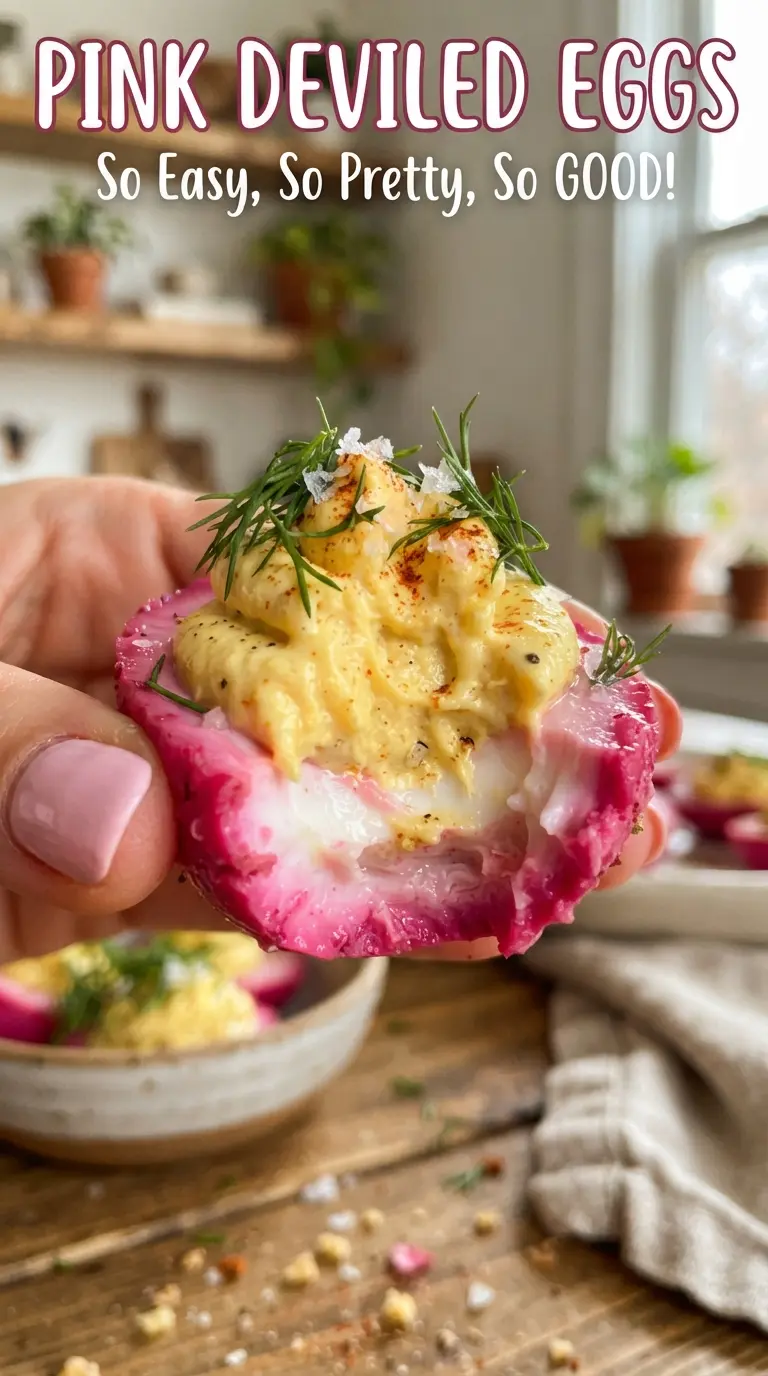
Pink deviled eggs get attention fast, but the color is only half the reason they disappear from a platter. The beet-pickled whites stay firm and tangy, the yolk filling turns creamy without feeling heavy, and every bite lands with that classic deviled egg comfort plus a little extra brightness. They look festive enough for a party and still taste like the kind of snack people hover around until the tray is empty.
The trick is giving the peeled eggs enough time in the beet brine for the color to fully move through the whites. Four hours gets you a lighter blush, but overnight is where that deep magenta really shows up. The filling stays clean and balanced because the yolks are mashed with mayonnaise, Dijon, and just a touch of white vinegar, which keeps the richness in check and sharpens the flavor.
Below, I’m walking through the beet bath that gives these eggs their color, the small details that keep the filling smooth, and a few smart swaps if you want to adjust the tang or make them ahead for a crowd.
The beet brine gave the whites the prettiest deep pink color, and the filling stayed smooth and pipeable after chilling. I made them the night before, and they were gone before dinner.
Save these pink deviled eggs for the platter that needs a little color and a lot of creamy, tangy bite.
The Beet Brine Is Doing More Than Coloring the Whites
With deviled eggs, the usual failure point is blandness. Either the filling tastes flat, or the whites get dressed up but don’t bring much to the party. Here, the beet brine pulls double duty: it colors the egg whites and adds a gentle tang that makes the whole egg taste brighter from the first bite.
The big mistake is rushing the soak. If you pull the eggs too early, the color sits on the surface instead of sinking in, and you end up with pale shells and a streaky look when you cut them. Overnight gives you the deepest result, but even a few hours in the brine is enough to move this recipe from ordinary to eye-catching.
- Eggs — Older eggs usually peel more cleanly than very fresh ones, which matters here because torn whites show every flaw once they’re dyed. A quick ice bath after cooking helps the shells slip off without mangling the surface.
- Sliced beets with juice — The juice is what gives the color, while the slices help reinforce the flavor in the pickling liquid. Plain beet juice can work, but the canned beets are convenient and consistent.
- Apple cider vinegar — This sharpens the brine and helps the beet color read more vividly. White vinegar can stand in if that’s what you have, but apple cider vinegar gives a softer edge.
- Dijon mustard — Dijon adds depth and a little backbone to the filling. Yellow mustard will work in a pinch, but the flavor is flatter and less polished.
What Each Ingredient Is Actually Doing in This Recipe
- Primary ingredient (the star) — Quality matters most. Choose the best you can find.
- Cooking medium (oil, butter, or broth) — This carries flavors and prevents dryness.
- Seasonings (salt, pepper, spices, herbs) — Layer flavors so nothing overpowers. Build depth gradually.
- Aromatics (garlic, onion, herbs) — Cook with fat to bloom flavors. Become the foundation.
- Supporting ingredients — Complement the main ingredient without overpowering it.
- Sauce or liquid (if applicable) — Brings flavors together. Balance richness with acid.
- Acid (lemon, vinegar, wine, or other) — Brightens and prevents flat-tasting results.
- Final finish (garnish, glaze, or sauce) — Prevents one-dimensional taste and adds visual appeal.
Getting the Color, Filling, and Shape Right
Cooking the Eggs Without a Green Ring
Put the eggs in cold water, bring them up to a boil, then remove the pot from the heat and cover it. That gentle finish gives you cooked yolks without the gray-green edge that comes from hard boiling too long. The ice bath matters here too, because it stops the cooking fast and makes peeling easier. If the shells cling, crack them all over and peel under running water.
Building the Beet Bath
Stir the beet juice, sliced beets, vinegar, sugar, and salt together until the sugar starts dissolving. The liquid should taste tangy, lightly sweet, and a little assertive, because the eggs will mellow it as they soak. Submerge the peeled eggs completely so the color develops evenly; any exposed spot stays pale. If the eggs float, lay a small plate or bowl on top to keep them under the liquid.
Mashing a Smooth Filling
Once the whites are colored, halve the eggs and remove the yolks while they’re still dry enough to handle cleanly. Mash the yolks until no large lumps remain before adding the mayonnaise, Dijon, vinegar, and salt. If you add the wet ingredients too early, the filling can turn pasty instead of creamy. Pipe or spoon it into the pink whites, then top with dill for a fresh finish.
How to Adapt These Pink Deviled Eggs Without Losing the Point
Make-Ahead Party Platter
These are excellent made ahead. Keep the beet-pickled whites and the yolk filling separate until a few hours before serving, then fill and garnish. That keeps the filling from drying out and keeps the whites looking clean instead of weeping color onto the plate.
Dairy-Free or Lighter Filling
This recipe is already dairy-free as written, which makes it easy to serve a mixed crowd. If you want a lighter filling, replace part of the mayonnaise with Greek-style dairy-free yogurt or mashed avocado, but expect a softer, less pipeable texture and a fresher, less classic egg salad-style finish.
Less Sweet, More Tangy
Cut the sugar in the beet brine to 2 tablespoons if you want a sharper pickle note. The eggs will still turn pink, but the flavor will lean more savory and less candy-like. That works especially well if you’re serving them alongside salty snacks or cured meats.
Storage and Reheating
- Refrigerator: Store filled deviled eggs in a covered container for up to 2 days. The whites may release a little color into the filling, but the flavor stays good.
- Freezer: Don’t freeze deviled eggs. The whites turn rubbery and the filling separates after thawing.
- Reheating: Serve chilled or cool from the fridge. These aren’t meant to be reheated, and warming them softens the filling and dulls the color.
Answers to the Questions Worth Asking

Pink Deviled Eggs
Ingredients
Method
- Place eggs in a pot, cover with cold water, and bring to a boil. Cover, remove from heat, and let stand 12 minutes, then chill and peel. Visual cue: yolks should be fully set with no wet center.
- Combine beet juice, sliced beets, apple cider vinegar, sugar, and 1/2 teaspoon salt in a jar. Submerge the peeled eggs so the whites are fully covered. Visual cue: the soaking liquid should be richly colored magenta.
- Refrigerate the eggs 4 hours or overnight until the whites are deep pink. Visual cue: the egg whites should turn an even vibrant pink.
- Halve the eggs and remove the yolks. Visual cue: you should have pink egg-white halves ready for piping.
- Mash yolks with mayonnaise, Dijon mustard, white vinegar, and 1/8 teaspoon salt until smooth. Visual cue: the mixture should look creamy and pipeable.
- Pipe the yolk mixture into the pink whites. Visual cue: fill each half with a neat mound.
- Top with fresh dill. Visual cue: green dill sprigs contrast with the pink filling for a clean finish.